
加入blockUI防止使用者重覆點擊,但在顯示遮罩時發生Gif圖檔的Loading不會動,查詢過後發現是blockUI的支援問題,需先預載圖片,也可利用Div將Loading圖檔隱藏,需要時再利用blockUI顯示。
<script language="javascript">
$.blockUI({
message: $('#divLoading'),
css: {
top: ($(window).height() - 400) /2 + 'px',
left: ($(window).width() - 400) /2 + 'px',
border: 'none',
backgroundColor:'transparent'
}
});
</script>
<div id="divLoading" style="display: none; padding: 15px">
<div style="font-size: 28px; vertical-align: middle; display: inline-block">
<asp:Image ID="imgLoadin" ImageUrl="~/images/loading.gif" runat="server" />
</div>
</div>
參考資料:
http://www.4byte.cn/question/653091/chrome-firefox-doesn-t-display-images-in-objects-shown-in-beforeunload-event.html
http://htmlasks.com/ie8_display_images_chrome_firefox_doesn39_t_display_images_with_blockui
http://stackoverflow.com/questions/20054776/ie8-display-images-chrome-firefox-doesnt-display-images-with-blockui
https://github.com/malsup/blockui/issues/119
<script language="javascript">
$(function() {
 $("input[id*=btn]").click(function(){
     $.blockUI();
 });
});
</script>
<asp:Button ID="btn" runat="server" CssClass="BtnBlue" />
jQuery blockUI 可修改參數表:
$.blockUI.defaults = {
    // 顯示的文字內容
    message:  '<h1>Please wait...</h1>',

    title: null,        // 標題的文字有時用套板時
    draggable: true,    // 拖曳.須加在 jQuery UI

    theme: false, // 設定 jQuery UI 的套版

    // 樣式設計
    css: {
        padding:        0,
        margin:         0,
        width:          '30%',
        top:            '40%',
        left:           '35%',
        textAlign:      'center',
        color:          '#000',
        border:         '3px solid #aaa',
        backgroundColor:'#fff',
        cursor:         'wait'
    },

    // 主題風格
    themedCSS: {
        width:  '30%',
        top:    '40%',
        left:   '35%'
    },

    // 背景圖層
    overlayCSS:  {
        backgroundColor: '#000',
        opacity:         0.6,
        cursor:          'wait'
    },

    // 鼠標圖示設定
    cursorReset: 'default',

    // 樣式運用 $.growlUI
    growlCSS: {
        width:    '350px',
        top:      '10px',
        left:     '',
        right:    '10px',
        border:   'none',
        padding:  '5px',
        opacity:   0.6,
        cursor:    null,
        color:    '#fff',
        backgroundColor: '#000',
        '-webkit-border-radius': '10px',
        '-moz-border-radius':    '10px'
    },

    // IE 讀取的問題
    iframeSrc: /^https/i.test(window.location.href || '') ? 'javascript:false' : 'about:blank',

    // 修復IE問題
    forceIframe: false,

    // z-index 設定
    baseZ: 1000,

    // 如果都設定為 true 則自動置中
    centerX: true,
    centerY: true,

    // 修復IE問題
    allowBodyStretch: true,

    // 是否禁止滑鼠事件
    bindEvents: true,

    // 鍵盤事件
    constrainTabKey: true,

    // 淡入的時間.單位為毫秒
    fadeIn:  200,

    // 淡出的時間.單位為毫秒
    fadeOut:  400,

    // 自動解鎖.單位為毫秒 0為手動解鎖
    timeout: 0,

    // 是否顯示覆蓋圖層
    showOverlay: true,

    // 是否設定滑鼠焦點
    focusInput: true,


    // 淡入完成後執行
    onBlock: null,

    // 淡出執行
    //   onUnblock(element, options)
    onUnblock: null,

    // IE BUG 需要知道詳細請看 http://groups.google.com/group/jquery-en/browse_thread/thread/36640a8730503595/2f6a79a77a78e493#2f6a79a77a78e493
    quirksmodeOffsetHack: 4,

    // 消息區塊 類別名稱
    blockMsgClass: 'blockMsg',

    // 是否重複允許封鎖
    ignoreIfBlocked: false
};
http://blog.hellocode.info/2012/11/jquery-blockui.html
僅利用Javascript達到相同的類式效果可參考此頁:
https://www.dotblogs.com.tw/joysdw12/archive/2012/12/13/85629.aspx
僅利用Javascript達到相同的類式效果可參考此頁:
https://www.dotblogs.com.tw/joysdw12/archive/2012/12/13/85629.aspx

新增客制Table包含Identity(會員登入)的 Code First Migrations
一.新增兩個Models,BolgModels及PostModels。


 (3)兩個導覽屬性 (Blog.Posts 和 Post.Blog) 虛擬化。這會啟用 Entity Framework 的「消極式載入」功能。「消極式載入」表示當您嘗試存取屬性的內容時,這些內容會自動從資料庫載入。


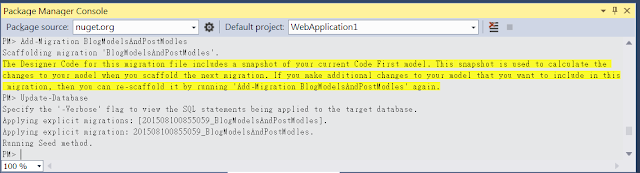
8.Migrations資料夾將會自動新增201508100855059_BlogModelsAndPostModles.cs


一.新增兩個Models,BolgModels及PostModels。
1.右鍵點選Models→Add→New Item

2.選擇Code→Class,輸入BlogModels.cs並且點選Add 。

3.新增BlogModels.cs及PostModels.cs。
(1)BlogModels新增BlogId及Name。

(2)PostModels新增PostId、Title、Content及BlogId。

4.Identity ApplicationDbContext新增DbSet BlogModels及PostModels
增加:
public virtual DbSet<BlogModels> BlogModels { get; set; }
public virtual DbSet<PostModels> PostModels { get; set; }

5.開啟Package Manager Console

6.新增移轉名稱(因為之前已新增info移轉名稱 for Identity Migrations)
PM> Add-Migration BlogModelsAndPostModles

7.更新至資料庫
PM> Update-Database

8.Migrations資料夾將會自動新增201508100855059_BlogModelsAndPostModles.cs

9.DB自動新增BlogModels及PostModels兩個Table。

參考資料:
https://msdn.microsoft.com/zh-tw/data/jj554735.aspx
http://www.cnblogs.com/nianming/p/3439260.html
http://www.cnblogs.com/libingql/p/3330880.html
http://www.cnblogs.com/kenshincui/p/3286103.html
http://kirkchen.logdown.com/posts/145581-using-aspnet-mvc-to-create-web-api-5-use-entityframework-code-first-database
http://blog.sanc.idv.tw/2013/05/entity-framework-code-first-ver-50.html
http://blog.sanc.idv.tw/2012/04/entity-framework-code-firstenabling.html
http://kevintsengtw.blogspot.tw/2013/10/aspnet-mvc-entity-framework-code-first.html
http://blog.sanc.idv.tw/2013/05/entity-framework-code-first-ver-50.html
http://blog.sanc.idv.tw/2012/04/entity-framework-code-firstenabling.html
http://kevintsengtw.blogspot.tw/2013/10/aspnet-mvc-entity-framework-code-first.html
利用Identity完成Code First Migrations 。
1.建立ASP.Net Web Application

2.讓專案包含Web Forms,MVC,Web API。
 3.成功建立ASP.Net Web Application

4.Identity的DbContext
Identity預設會將DbContext直接寫在IdentityModels.cs,ApplicationDbContext這個class內。
DefaultConnection為Web.config內設定的DBConnection。

5.開啟Package Manager Console
6.Package Manager Console開啟的畫面

7.Visual Studio 2013已內建EntityFramework,如果未內建EntityFramework則需先安裝EntityFramework。
安裝EntityFramework
PM> Install-Package EntityFramework

8.啟動Migration
PM> Enable-Migrations -EnableAutomaticMigrations


10.更新資料庫
PM> Update-Database


 13.檢查Migrations資料夾內的Configuration.cs將AutomaticMigrationsEnabled 是否為True。
AutomaticMigrationsEnabled = true;

14.查看201508100619466_info.cs裡面會包含Up()及Down()的方法,up為Migrations升版,down為Migrations降版。
Up()內新增初次建立Identity的Table


參考資料:
http://www.cnblogs.com/libingql/p/3330880.html
http://www.cnblogs.com/nianming/p/3439260.html
https://msdn.microsoft.com/zh-tw/data/jj193542
http://kevintsengtw.blogspot.tw/2013/10/aspnet-mvc-entity-framework-code-first.html
http://blog.sanc.idv.tw/2012/04/entity-framework-code-firstenabling.html
http://blog.sanc.idv.tw/2013/05/entity-framework-code-first-ver-50.html
http://kirkchen.logdown.com/posts/145581-using-aspnet-mvc-to-create-web-api-5-use-entityframework-code-first-database
http://www.cnblogs.com/kenshincui/p/3286103.html
1.建立ASP.Net Web Application

2.讓專案包含Web Forms,MVC,Web API。


4.Identity的DbContext
Identity預設會將DbContext直接寫在IdentityModels.cs,ApplicationDbContext這個class內。
DefaultConnection為Web.config內設定的DBConnection。

5.開啟Package Manager Console
6.Package Manager Console開啟的畫面

7.Visual Studio 2013已內建EntityFramework,如果未內建EntityFramework則需先安裝EntityFramework。
安裝EntityFramework
PM> Install-Package EntityFramework

8.啟動Migration
PM> Enable-Migrations -EnableAutomaticMigrations

9.新增 Migration腳本,info為腳本名稱,初次建立建議使用info為初使名稱。
PM> Add-Migration info

10.更新資料庫
PM> Update-Database

11.新增完成後Solution Explorer 會自動新增Migrations資料夾,並且增加Configuration.cs及201508100619466_info.cs。

12.Server Explorer可看到資料庫內自動新增了Identity使用的五個Table及Migrations 記錄資訊的Table。
(1)_MigrationHistory
(2)AspNetRoles
(3)AspNetUserClaims
(4)AspNetUserLogins
(5)AspNetUserRoles
(6)AspNetUsers

AutomaticMigrationsEnabled = true;

14.查看201508100619466_info.cs裡面會包含Up()及Down()的方法,up為Migrations升版,down為Migrations降版。
Up()內新增初次建立Identity的Table

down()將Identity新建立的table刪除。

參考資料:
http://www.cnblogs.com/libingql/p/3330880.html
http://www.cnblogs.com/nianming/p/3439260.html
https://msdn.microsoft.com/zh-tw/data/jj193542
http://kevintsengtw.blogspot.tw/2013/10/aspnet-mvc-entity-framework-code-first.html
http://blog.sanc.idv.tw/2012/04/entity-framework-code-firstenabling.html
http://blog.sanc.idv.tw/2013/05/entity-framework-code-first-ver-50.html
http://kirkchen.logdown.com/posts/145581-using-aspnet-mvc-to-create-web-api-5-use-entityframework-code-first-database
http://www.cnblogs.com/kenshincui/p/3286103.html
Visual Studio 2013預設連結的Connection為LocalDb
LocalDb設定的Web.config如下:
<configuration>
<connectionStrings>
<add name="DefaultConnection" connectionString="Data Source=(LocalDb)\v11.0;AttachDbFilename=|DataDirectory|\aspnet-20150807-1029-CodeFirst-20150807102956.mdf;Initial Catalog=aspnet-20150807-1029-CodeFirst-20150807102956;Integrated Security=True"
providerName="System.Data.SqlClient" />
</connectionStrings>
<entityFramework>
<defaultConnectionFactory type="System.Data.Entity.Infrastructure.LocalDbConnectionFactory, EntityFramework">
<parameters>
<parameter value="mssqllocaldb" />
</parameters>
</defaultConnectionFactory>
<providers>
<provider invariantName="System.Data.SqlClient" type="System.Data.Entity.SqlServer.SqlProviderServices, EntityFramework.SqlServer" />
</providers>
</entityFramework>
</configuration>
資料庫連結變更為連結SQL Server設定的Web.config如下:
<configuration>
<connectionStrings>
<add name="DefaultConnection" providerName="System.Data.SqlClient" connectionString="Data Source=JETER\JETERMSSQLSERVER;Database=BlogDB;Integrated Security=True;" />
</connectionStrings>
<entityFramework>
<defaultConnectionFactory type="System.Data.Entity.Infrastructure.SqlconnectionFactory, EntityFramework">
<parameters>
<parameter value="Data Source=JETER\JETERMSSQLSERVER; Integrated Security=True;MultipleActiveResultSets=True" />
</parameters>
</defaultConnectionFactory>
<providers>
<provider invariantName="System.Data.SqlClient" type="System.Data.Entity.SqlServer.SqlProviderServices, EntityFramework.SqlServer" />
</providers>
</entityFramework>
</configuration>
LocalDb設定的Web.config如下:
<configuration>
<connectionStrings>
<add name="DefaultConnection" connectionString="Data Source=(LocalDb)\v11.0;AttachDbFilename=|DataDirectory|\aspnet-20150807-1029-CodeFirst-20150807102956.mdf;Initial Catalog=aspnet-20150807-1029-CodeFirst-20150807102956;Integrated Security=True"
providerName="System.Data.SqlClient" />
</connectionStrings>
<entityFramework>
<defaultConnectionFactory type="System.Data.Entity.Infrastructure.LocalDbConnectionFactory, EntityFramework">
<parameters>
<parameter value="mssqllocaldb" />
</parameters>
</defaultConnectionFactory>
<providers>
<provider invariantName="System.Data.SqlClient" type="System.Data.Entity.SqlServer.SqlProviderServices, EntityFramework.SqlServer" />
</providers>
</entityFramework>
</configuration>
資料庫連結變更為連結SQL Server設定的Web.config如下:
<configuration>
<connectionStrings>
<add name="DefaultConnection" providerName="System.Data.SqlClient" connectionString="Data Source=JETER\JETERMSSQLSERVER;Database=BlogDB;Integrated Security=True;" />
</connectionStrings>
<entityFramework>
<defaultConnectionFactory type="System.Data.Entity.Infrastructure.SqlconnectionFactory, EntityFramework">
<parameters>
<parameter value="Data Source=JETER\JETERMSSQLSERVER; Integrated Security=True;MultipleActiveResultSets=True" />
</parameters>
</defaultConnectionFactory>
<providers>
<provider invariantName="System.Data.SqlClient" type="System.Data.Entity.SqlServer.SqlProviderServices, EntityFramework.SqlServer" />
</providers>
</entityFramework>
</configuration>
1.建立Console Application

2.在Program.cs 加入System.Data.Entity的References
(1)


Package Manager Console開啟路徑位置:


4.建立模型(Model)
兩個導覽屬性 (Blog.Posts 和 Post.Blog) 虛擬化。這會啟用 Entity Framework 的「消極式載入」功能。「消極式載入」表示當您嘗試存取屬性的內容時,這些內容會自動從資料庫載入。
5.建立內容(DbContext )

資料參考 :https://msdn.microsoft.com/zh-tw/data/jj193542

2.在Program.cs 加入System.Data.Entity的References
(1)

(2)勾選System.Data.Entity及System.Data.Entity.Design點擊OK

3.加入Entity Framework
方法1:
(1)選擇Solution Explorer 點擊右鍵Manage NuGet Packages

(2)選擇Online→nuget.org

(3)選擇Entity Framework→Install

(4)選擇 I Accept

(5)References將新增EntityFramework及EnityFramework.SqlServer

方法二:
開啟Package Manager Console(程式庫封裝管理員)安裝Entity Framework。Package Manager Console開啟路徑位置:

安裝Entity Framework
PM> Install-Package EntityFramework

在 Program.cs 中的 Program 類別定義下,加入下列兩個類別。
public class Blog
{
    public int BlogId { get; set; }
    public string Name { get; set; }

    public virtual List<Post> Posts { get; set; }
}

public class Post
{
    public int PostId { get; set; }
    public string Title { get; set; }
    public string Content { get; set; }

    public int BlogId { get; set; }
    public virtual Blog Blog { get; set; }
}
兩個導覽屬性 (Blog.Posts 和 Post.Blog) 虛擬化。這會啟用 Entity Framework 的「消極式載入」功能。「消極式載入」表示當您嘗試存取屬性的內容時,這些內容會自動從資料庫載入。
5.建立內容(DbContext )
public class BloggingContext : DbContext
{
    public DbSet<Blog> Blogs { get; set; }
    public DbSet<Post> Posts { get; set; }
}
6.讀取及寫入資料
class Program
{
    static void Main(string[] args)
    {
        using (var db = new BloggingContext())
        {
            // Create and save a new Blog
            Console.Write("Enter a name for a new Blog: ");
            var name = Console.ReadLine();

            var blog = new Blog { Name = name };
            db.Blogs.Add(blog);
            db.SaveChanges();

            // Display all Blogs from the database
            var query = from b in db.Blogs
                        orderby b.Name
                        select b;

            Console.WriteLine("All blogs in the database:");
            foreach (var item in query)
            {
                Console.WriteLine(item.Name);
            }

            Console.WriteLine("Press any key to exit...");
            Console.ReadKey();
        }
    }
}
7.測試應用程式
資料參考 :https://msdn.microsoft.com/zh-tw/data/jj193542


 發表文章
發表文章

