加入blockUI防止使用者重覆點擊,但在顯示遮罩時發生Gif圖檔的Loading不會動,查詢過後發現是blockUI的支援問題,需先預載圖片,也可利用Div將Loading圖檔隱藏,需要時再利用blockUI顯示。
<script language="javascript">
$.blockUI({
message: $('#divLoading'),
css: {
top: ($(window).height() - 400) /2 + 'px',
left: ($(window).width() - 400) /2 + 'px',
border: 'none',
backgroundColor:'transparent'
}
});
</script>
<div id="divLoading" style="display: none; padding: 15px">
<div style="font-size: 28px; vertical-align: middle; display: inline-block">
<asp:Image ID="imgLoadin" ImageUrl="~/images/loading.gif" runat="server" />
</div>
</div>
參考資料:
http://www.4byte.cn/question/653091/chrome-firefox-doesn-t-display-images-in-objects-shown-in-beforeunload-event.html
http://htmlasks.com/ie8_display_images_chrome_firefox_doesn39_t_display_images_with_blockui
http://stackoverflow.com/questions/20054776/ie8-display-images-chrome-firefox-doesnt-display-images-with-blockui
https://github.com/malsup/blockui/issues/119
<script language="javascript">
$(function() {
 $("input[id*=btn]").click(function(){
     $.blockUI();
 });
});
</script>
<asp:Button ID="btn" runat="server" CssClass="BtnBlue" />
jQuery blockUI 可修改參數表:
$.blockUI.defaults = {
    // 顯示的文字內容
    message:  '<h1>Please wait...</h1>',

    title: null,        // 標題的文字有時用套板時
    draggable: true,    // 拖曳.須加在 jQuery UI

    theme: false, // 設定 jQuery UI 的套版

    // 樣式設計
    css: {
        padding:        0,
        margin:         0,
        width:          '30%',
        top:            '40%',
        left:           '35%',
        textAlign:      'center',
        color:          '#000',
        border:         '3px solid #aaa',
        backgroundColor:'#fff',
        cursor:         'wait'
    },

    // 主題風格
    themedCSS: {
        width:  '30%',
        top:    '40%',
        left:   '35%'
    },

    // 背景圖層
    overlayCSS:  {
        backgroundColor: '#000',
        opacity:         0.6,
        cursor:          'wait'
    },

    // 鼠標圖示設定
    cursorReset: 'default',

    // 樣式運用 $.growlUI
    growlCSS: {
        width:    '350px',
        top:      '10px',
        left:     '',
        right:    '10px',
        border:   'none',
        padding:  '5px',
        opacity:   0.6,
        cursor:    null,
        color:    '#fff',
        backgroundColor: '#000',
        '-webkit-border-radius': '10px',
        '-moz-border-radius':    '10px'
    },

    // IE 讀取的問題
    iframeSrc: /^https/i.test(window.location.href || '') ? 'javascript:false' : 'about:blank',

    // 修復IE問題
    forceIframe: false,

    // z-index 設定
    baseZ: 1000,

    // 如果都設定為 true 則自動置中
    centerX: true,
    centerY: true,

    // 修復IE問題
    allowBodyStretch: true,

    // 是否禁止滑鼠事件
    bindEvents: true,

    // 鍵盤事件
    constrainTabKey: true,

    // 淡入的時間.單位為毫秒
    fadeIn:  200,

    // 淡出的時間.單位為毫秒
    fadeOut:  400,

    // 自動解鎖.單位為毫秒 0為手動解鎖
    timeout: 0,

    // 是否顯示覆蓋圖層
    showOverlay: true,

    // 是否設定滑鼠焦點
    focusInput: true,


    // 淡入完成後執行
    onBlock: null,

    // 淡出執行
    //   onUnblock(element, options)
    onUnblock: null,

    // IE BUG 需要知道詳細請看 http://groups.google.com/group/jquery-en/browse_thread/thread/36640a8730503595/2f6a79a77a78e493#2f6a79a77a78e493
    quirksmodeOffsetHack: 4,

    // 消息區塊 類別名稱
    blockMsgClass: 'blockMsg',

    // 是否重複允許封鎖
    ignoreIfBlocked: false
};
http://blog.hellocode.info/2012/11/jquery-blockui.html
僅利用Javascript達到相同的類式效果可參考此頁:
https://www.dotblogs.com.tw/joysdw12/archive/2012/12/13/85629.aspx
僅利用Javascript達到相同的類式效果可參考此頁:
https://www.dotblogs.com.tw/joysdw12/archive/2012/12/13/85629.aspx
新增客制Table包含Identity(會員登入)的 Code First Migrations
一.新增兩個Models,BolgModels及PostModels。


 (3)兩個導覽屬性 (Blog.Posts 和 Post.Blog) 虛擬化。這會啟用 Entity Framework 的「消極式載入」功能。「消極式載入」表示當您嘗試存取屬性的內容時,這些內容會自動從資料庫載入。


8.Migrations資料夾將會自動新增201508100855059_BlogModelsAndPostModles.cs


一.新增兩個Models,BolgModels及PostModels。
1.右鍵點選Models→Add→New Item

2.選擇Code→Class,輸入BlogModels.cs並且點選Add 。

3.新增BlogModels.cs及PostModels.cs。
(1)BlogModels新增BlogId及Name。

(2)PostModels新增PostId、Title、Content及BlogId。

4.Identity ApplicationDbContext新增DbSet BlogModels及PostModels
增加:
public virtual DbSet<BlogModels> BlogModels { get; set; }
public virtual DbSet<PostModels> PostModels { get; set; }

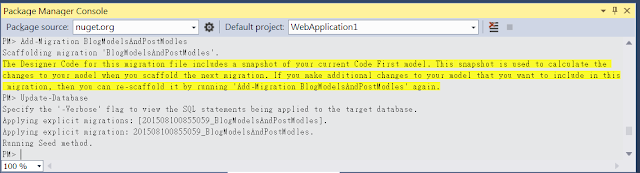
5.開啟Package Manager Console

6.新增移轉名稱(因為之前已新增info移轉名稱 for Identity Migrations)
PM> Add-Migration BlogModelsAndPostModles

7.更新至資料庫
PM> Update-Database

8.Migrations資料夾將會自動新增201508100855059_BlogModelsAndPostModles.cs

9.DB自動新增BlogModels及PostModels兩個Table。

參考資料:
https://msdn.microsoft.com/zh-tw/data/jj554735.aspx
http://www.cnblogs.com/nianming/p/3439260.html
http://www.cnblogs.com/libingql/p/3330880.html
http://www.cnblogs.com/kenshincui/p/3286103.html
http://kirkchen.logdown.com/posts/145581-using-aspnet-mvc-to-create-web-api-5-use-entityframework-code-first-database
http://blog.sanc.idv.tw/2013/05/entity-framework-code-first-ver-50.html
http://blog.sanc.idv.tw/2012/04/entity-framework-code-firstenabling.html
http://kevintsengtw.blogspot.tw/2013/10/aspnet-mvc-entity-framework-code-first.html
http://blog.sanc.idv.tw/2013/05/entity-framework-code-first-ver-50.html
http://blog.sanc.idv.tw/2012/04/entity-framework-code-firstenabling.html
http://kevintsengtw.blogspot.tw/2013/10/aspnet-mvc-entity-framework-code-first.html
利用Identity完成Code First Migrations 。
1.建立ASP.Net Web Application

2.讓專案包含Web Forms,MVC,Web API。
 3.成功建立ASP.Net Web Application

4.Identity的DbContext
Identity預設會將DbContext直接寫在IdentityModels.cs,ApplicationDbContext這個class內。
DefaultConnection為Web.config內設定的DBConnection。

5.開啟Package Manager Console
6.Package Manager Console開啟的畫面

7.Visual Studio 2013已內建EntityFramework,如果未內建EntityFramework則需先安裝EntityFramework。
安裝EntityFramework
PM> Install-Package EntityFramework

8.啟動Migration
PM> Enable-Migrations -EnableAutomaticMigrations


10.更新資料庫
PM> Update-Database


 13.檢查Migrations資料夾內的Configuration.cs將AutomaticMigrationsEnabled 是否為True。
AutomaticMigrationsEnabled = true;

14.查看201508100619466_info.cs裡面會包含Up()及Down()的方法,up為Migrations升版,down為Migrations降版。
Up()內新增初次建立Identity的Table


參考資料:
http://www.cnblogs.com/libingql/p/3330880.html
http://www.cnblogs.com/nianming/p/3439260.html
https://msdn.microsoft.com/zh-tw/data/jj193542
http://kevintsengtw.blogspot.tw/2013/10/aspnet-mvc-entity-framework-code-first.html
http://blog.sanc.idv.tw/2012/04/entity-framework-code-firstenabling.html
http://blog.sanc.idv.tw/2013/05/entity-framework-code-first-ver-50.html
http://kirkchen.logdown.com/posts/145581-using-aspnet-mvc-to-create-web-api-5-use-entityframework-code-first-database
http://www.cnblogs.com/kenshincui/p/3286103.html
1.建立ASP.Net Web Application

2.讓專案包含Web Forms,MVC,Web API。


4.Identity的DbContext
Identity預設會將DbContext直接寫在IdentityModels.cs,ApplicationDbContext這個class內。
DefaultConnection為Web.config內設定的DBConnection。

5.開啟Package Manager Console
6.Package Manager Console開啟的畫面

7.Visual Studio 2013已內建EntityFramework,如果未內建EntityFramework則需先安裝EntityFramework。
安裝EntityFramework
PM> Install-Package EntityFramework

8.啟動Migration
PM> Enable-Migrations -EnableAutomaticMigrations

9.新增 Migration腳本,info為腳本名稱,初次建立建議使用info為初使名稱。
PM> Add-Migration info

10.更新資料庫
PM> Update-Database

11.新增完成後Solution Explorer 會自動新增Migrations資料夾,並且增加Configuration.cs及201508100619466_info.cs。

12.Server Explorer可看到資料庫內自動新增了Identity使用的五個Table及Migrations 記錄資訊的Table。
(1)_MigrationHistory
(2)AspNetRoles
(3)AspNetUserClaims
(4)AspNetUserLogins
(5)AspNetUserRoles
(6)AspNetUsers

AutomaticMigrationsEnabled = true;

14.查看201508100619466_info.cs裡面會包含Up()及Down()的方法,up為Migrations升版,down為Migrations降版。
Up()內新增初次建立Identity的Table

down()將Identity新建立的table刪除。

參考資料:
http://www.cnblogs.com/libingql/p/3330880.html
http://www.cnblogs.com/nianming/p/3439260.html
https://msdn.microsoft.com/zh-tw/data/jj193542
http://kevintsengtw.blogspot.tw/2013/10/aspnet-mvc-entity-framework-code-first.html
http://blog.sanc.idv.tw/2012/04/entity-framework-code-firstenabling.html
http://blog.sanc.idv.tw/2013/05/entity-framework-code-first-ver-50.html
http://kirkchen.logdown.com/posts/145581-using-aspnet-mvc-to-create-web-api-5-use-entityframework-code-first-database
http://www.cnblogs.com/kenshincui/p/3286103.html
Visual Studio 2013預設連結的Connection為LocalDb
LocalDb設定的Web.config如下:
<configuration>
<connectionStrings>
<add name="DefaultConnection" connectionString="Data Source=(LocalDb)\v11.0;AttachDbFilename=|DataDirectory|\aspnet-20150807-1029-CodeFirst-20150807102956.mdf;Initial Catalog=aspnet-20150807-1029-CodeFirst-20150807102956;Integrated Security=True"
providerName="System.Data.SqlClient" />
</connectionStrings>
<entityFramework>
<defaultConnectionFactory type="System.Data.Entity.Infrastructure.LocalDbConnectionFactory, EntityFramework">
<parameters>
<parameter value="mssqllocaldb" />
</parameters>
</defaultConnectionFactory>
<providers>
<provider invariantName="System.Data.SqlClient" type="System.Data.Entity.SqlServer.SqlProviderServices, EntityFramework.SqlServer" />
</providers>
</entityFramework>
</configuration>
資料庫連結變更為連結SQL Server設定的Web.config如下:
<configuration>
<connectionStrings>
<add name="DefaultConnection" providerName="System.Data.SqlClient" connectionString="Data Source=JETER\JETERMSSQLSERVER;Database=BlogDB;Integrated Security=True;" />
</connectionStrings>
<entityFramework>
<defaultConnectionFactory type="System.Data.Entity.Infrastructure.SqlconnectionFactory, EntityFramework">
<parameters>
<parameter value="Data Source=JETER\JETERMSSQLSERVER; Integrated Security=True;MultipleActiveResultSets=True" />
</parameters>
</defaultConnectionFactory>
<providers>
<provider invariantName="System.Data.SqlClient" type="System.Data.Entity.SqlServer.SqlProviderServices, EntityFramework.SqlServer" />
</providers>
</entityFramework>
</configuration>
1.建立Console Application

2.在Program.cs 加入System.Data.Entity的References
(1)


Package Manager Console開啟路徑位置:


4.建立模型(Model)
兩個導覽屬性 (Blog.Posts 和 Post.Blog) 虛擬化。這會啟用 Entity Framework 的「消極式載入」功能。「消極式載入」表示當您嘗試存取屬性的內容時,這些內容會自動從資料庫載入。
5.建立內容(DbContext )

資料參考 :https://msdn.microsoft.com/zh-tw/data/jj193542

2.在Program.cs 加入System.Data.Entity的References
(1)

(2)勾選System.Data.Entity及System.Data.Entity.Design點擊OK

3.加入Entity Framework
方法1:
(1)選擇Solution Explorer 點擊右鍵Manage NuGet Packages

(2)選擇Online→nuget.org

(3)選擇Entity Framework→Install

(4)選擇 I Accept

(5)References將新增EntityFramework及EnityFramework.SqlServer

方法二:
開啟Package Manager Console(程式庫封裝管理員)安裝Entity Framework。Package Manager Console開啟路徑位置:

安裝Entity Framework
PM> Install-Package EntityFramework

在 Program.cs 中的 Program 類別定義下,加入下列兩個類別。
public class Blog
{
    public int BlogId { get; set; }
    public string Name { get; set; }

    public virtual List<Post> Posts { get; set; }
}

public class Post
{
    public int PostId { get; set; }
    public string Title { get; set; }
    public string Content { get; set; }

    public int BlogId { get; set; }
    public virtual Blog Blog { get; set; }
}
兩個導覽屬性 (Blog.Posts 和 Post.Blog) 虛擬化。這會啟用 Entity Framework 的「消極式載入」功能。「消極式載入」表示當您嘗試存取屬性的內容時,這些內容會自動從資料庫載入。
5.建立內容(DbContext )
public class BloggingContext : DbContext
{
    public DbSet<Blog> Blogs { get; set; }
    public DbSet<Post> Posts { get; set; }
}
6.讀取及寫入資料
class Program
{
    static void Main(string[] args)
    {
        using (var db = new BloggingContext())
        {
            // Create and save a new Blog
            Console.Write("Enter a name for a new Blog: ");
            var name = Console.ReadLine();

            var blog = new Blog { Name = name };
            db.Blogs.Add(blog);
            db.SaveChanges();

            // Display all Blogs from the database
            var query = from b in db.Blogs
                        orderby b.Name
                        select b;

            Console.WriteLine("All blogs in the database:");
            foreach (var item in query)
            {
                Console.WriteLine(item.Name);
            }

            Console.WriteLine("Press any key to exit...");
            Console.ReadKey();
        }
    }
}
7.測試應用程式
資料參考 :https://msdn.microsoft.com/zh-tw/data/jj193542


參考資料:http://www.flycan.com/article/css/javascript-jquery-slider-1334.html
依照參考資料的jQuery練習了兩種不同功能顯示方式。
方法一:依頁數隱藏左右滑動箭頭。
<head>
<script language="javascript">
(function($) {
$(function(){
var gNum=0;//組數的初始值
var dX=0;//水平座標位置
var OuterBoxWidth=$(".slider").width();//外層寬度
var TotalPage=Math.floor(($(".slider ul").width()-1)/OuterBoxWidth);//總組數
$(".status li").eq(gNum).addClass("now");
$(".prev").hide();
if(TotalPage==0){
$(".next").hide();
}
$(".next").click(function(){
if(gNum<TotalPage){
gNum++;
dX = gNum*OuterBoxWidth*-1;
$(".prev").show();
if(gNum==TotalPage){
$(".next").hide();
}
else
{
$(".next").show();
}
}
SS();
});
$(".prev").click(function(){
if(gNum>0){
gNum--;
dX = gNum*OuterBoxWidth*-1;
$(".next").show();
if(gNum==0){
$(".prev").hide();
}
}
else
{
$(".next").show();
}
SS();
});
function SS(){
$(".slider ul").stop().animate({left:dX}, 700);
$(".status li").removeClass().eq(gNum).addClass("now");
}
$(".status li").click(function(){
gNum=$(this).index();
dX = gNum*OuterBoxWidth*-1;
SS();
});
});
})(jQuery);
</script>
</head>
方法二:首頁點選左箭頭滑動至頁尾,頁尾點選右箭頭滑動至首頁。
<head>
<script language="javascript">
(function($) {
$(function(){
var gNum=0;//組數的初始值
var dX=0;//水平座標位置
var OuterBoxWidth=$(".slider").width();//外層寬度
var TotalPage=Math.floor(($(".slider ul").width()-1)/OuterBoxWidth);//總組數
$(".status li").eq(gNum).addClass("now");
$(".next").click(function(){
if(gNum<TotalPage){
gNum++;
dX = gNum*OuterBoxWidth*-1;
}else{
gNum=0;
dX = 0;
}
SS();
});
$(".prev").click(function(){
if(gNum>0){
gNum--;
dX = gNum*OuterBoxWidth*-1;
$(".next").show();
}
else
{
if (TotalPage>= 1)
{
dX = TotalPage*OuterBoxWidth*-1;
gNum = TotalPage
}
}
SS();
});
function SS(){
$(".slider ul").stop().animate({left:dX}, 700);
$(".status li").removeClass().eq(gNum).addClass("now");
}
$(".status li").click(function(){
gNum=$(this).index();
dX = gNum*OuterBoxWidth*-1;
SS();
});
});
})(jQuery);
</script>
</head>
CSS部份:
<style type="text/css">
.list{ list-style:none; margin:0; padding:0;}
.sliderBox{ background-color :#ede9e8; width:960px; overflow:hidden; position:relative;padding-bottom:7px; }
.slider{ width:888px; height:50px; overflow:hidden; margin:auto; position:relative;}
.slider ul{ overflow:hidden; position:absolute; left:0;list-style-type:none;}
.slider li{ float:left;text-align:center;list-style-type:none;}
.status{ text-align:center; margin-top:0px; position:relative\9; *margin-left:435px;}
.status li{ cursor:pointer; background:#FFF; display:inline-block; text-indent:-9999px; border:2px solid #CCC; width:8px; height:8px; border-radius:100%; margin:0 5px; *float:left; }
.status li.now{ background:#09C; border-color:#999;}
.dIcon{ text-indent:-9999px; position:absolute; top:15px; display:block; width:10px; height:10px; background:url(../slider.png) no-repeat; width:22px; height:30px;}
.next{ right:5px; background-position:-22px -2px;}
.prev{ left:5px; background-position:0 -2px;}
.next:hover{ background-position:-22px -32px;}
.prev:hover{ background-position:0 -32px;}
</style>
HTML的部份:
<div class="sliderBox">
<div class="slider">
<ul id="ulSlider" class="list" runat="server">
<li>
<table border="0" bgcolor="#ede9e8" width="296">
<tr>
<td width="50" rowspan="2" align="left" style= "word-break:break-all;">
<asp:Image ID="img" runat="server" ImageUrl=''/>
</td>
<td width="246" align="left" valign="bottom">
<div style="width: 236px;text-overflow:ellipsis; white-space:nowrap;overflow:hidden">
<asp:LinkButton ID="btname" style="text-decoration:none" ForeColor="Black" runat="server" Text='name'></asp:LinkButton>
</div>
</td>
</tr>
<tr>
<td width="246" align="left" valign="top" style= "word-break:break-all;">
<asp:LinkButton ID="btDesc" style="text-decoration:none;" ForeColor="Black" runat="server" Text='Desc'></asp:LinkButton>
</td>
</tr>
</table>
</ul>
</div>
<a href="javascript:;" class="dIcon next">Next</a>
<a href="javascript:;" class="dIcon prev">Prev</a>
</div>
1.Dynamic add control LinkButton
'Generate Name Link Button
Dim btnName As New LinkButton AddHandler btnName.Click, AddressOf btnDownload_Click
btnName.ID = "123"
btnName.CommandName = "name"
btnName.Attributes.Add("runat", "server")
btnName.Style.Add("text-decoration", "none")
2.Dynamic add control table and insert Link Button to TD
'Generate table
Dim table As New Table()
Dim tRow As New TableRow()
Dim tCell As New TableCell()
'Insert link button to table
tCell.Controls.Add(btnName)
tRow.Cells.Add(tCell)
table.Rows.Add(tRow)
3.Dynamic add control DIV and insert Table to DIV
'Generate div
Dim div As New HtmlGenericControl("div")
'Insert table to Div
div.Controls.Add(table)
參考資料:
http://www.allenkuo.com/EBook5/view.aspx?TreeNodeID=31&id=58
http://www.blueshop.com.tw/board/show.asp?subcde=BRD20071105235713OLJ&fumcde=
www.blueshop.com.tw/board/FUM20041006161839LRJ/BRD20060910192120K3P.html
http://www.blueshop.com.tw/board/FUM20041006161839LRJ/BRD20120828093044OHM.html
http://www.aspsnippets.com/Articles/ASPNet-Persist-Dynamic-Controls-Dynamic-Controls-disappear-after-PostBack-in-ASPNet.aspx
http://jayhsunote.blogspot.tw/2011/06/aspnet-controlusercontrolpostback.html
http://w3937.pixnet.net/blog/post/75882652-%5Bc%23%5Dasp.net-%E5%8B%95%E6%85%8B%E7%94%A2%E7%94%9F%E6%8E%A7%E5%88%B6%E9%A0%85%E7%AD%86%E8%A8%98
http://www.dotblogs.com.tw/jeff377/archive/2008/03/17/1727.aspx
http://zongnansieprogram.blogspot.tw/2013/09/c-vb-pageload-pageinit.html?spref=fb
http://www.aspsnippets.com/Articles/ASPNet-Dynamic-Controls-ViewState-Retain-state-for-dynamically-created-controls-on-PostBack.aspx
<html>
<head>
<script src="//ajax.googleapis.com/ajax/libs/jquery/1.9.1/jquery.min.js"></script>
<style type="text/css">
.left {
float:left;
}
</style>
<script language="javascript">
$(document).ready(function(){
alert($(document).width());
var docw = $(document).width() - 599;
$("#SliderRight").click(function(){
$("#main").animate({
scrollLeft: $("#main").scrollLeft() + docw
}, 700,function(){});
});
$("#SliderLeft").click(function(){
$("#main").animate({
scrollLeft: $("#main").scrollLeft() - docw
}, 700,function(){});
});
});
</script>
</head>
<body>
</html>
參考資料:
http://sweeteason.pixnet.net/blog/post/37793032-%E7%B7%B4%E7%BF%92%E7%94%A8jquery-%E8%AE%93%E9%A0%81%E9%9D%A2%E5%B7%A6%E5%8F%B3%E6%BB%91%E5%8B%95
<head>
<script src="//ajax.googleapis.com/ajax/libs/jquery/1.9.1/jquery.min.js"></script>
<style type="text/css">
.left {
float:left;
}
</style>
<script language="javascript">
$(document).ready(function(){
alert($(document).width());
var docw = $(document).width() - 599;
$("#SliderRight").click(function(){
$("#main").animate({
scrollLeft: $("#main").scrollLeft() + docw
}, 700,function(){});
});
$("#SliderLeft").click(function(){
$("#main").animate({
scrollLeft: $("#main").scrollLeft() - docw
}, 700,function(){});
});
});
</script>
</head>
<body>
<input type="button" id="left" value="左" />
<input type="button" id="right" value="右" />
<div id="main" style="margin: 50px auto; overflow: hidden; width: 100%; height: 600px;">
<div style="width: 4200px;">
<div class="left">1<br /><img src="1.jpg" alt="" width="300px" /></div>
<div class="left">2<br /><img src="2.jpg" alt="" width="300px" /></div>
<div class="left">3<br /><img src="3.jpg" alt="" width="300px" /></div>
<div class="left">4<br /><img src="4.jpg" alt="" width="300px" /></div>
<div class="left">5<br /><img src="5.jpg" alt="" width="300px" /></div>
</div>
</div>
</body>
</html>
參考資料:
http://sweeteason.pixnet.net/blog/post/37793032-%E7%B7%B4%E7%BF%92%E7%94%A8jquery-%E8%AE%93%E9%A0%81%E9%9D%A2%E5%B7%A6%E5%8F%B3%E6%BB%91%E5%8B%95
新增Chart Control
Visual Studio 2008 web.config加入MSChart的元件 (.Net Framework 3.5)
<configuration>
<appSettings>
<add key="ChartImageHandler" value="storage=file;timeout=20;url=~\images\chartTemporary\;" />
</appSettings>
<system.webServer>
<handlers>
<remove name="ChartImageHandler" />
<add name="ChartImageHandler" preCondition="integratedMode" verb="POST,GET,HEAD" path="ChartImg.axd" type="System.Web.UI.DataVisualization.Charting.ChartHttpHandler, System.Web.DataVisualization, Version=3.5.0.0, Culture=neutral, PublicKeyToken=31bf3856ad364e35" />
</handlers>
</system.webServer>
<system.web>
<httpHandlers>
<add path="ChartImg.axd" verb="GET,HEAD,POST" type="System.Web.UI.DataVisualization.Charting.ChartHttpHandler, System.Web.DataVisualization, Version=3.5.0.0, Culture=neutral, PublicKeyToken=31bf3856ad364e35" validate="false"/>
</httpHandlers>
</system.web>
<pages validateRequest="false" enableEventValidation="false" enableViewStateMac="true">
<controls>
<add tagPrefix="asp" namespace="System.Web.UI.DataVisualization.Charting" assembly="System.Web.DataVisualization, Version=3.5.0.0, Culture=neutral, PublicKeyToken=31bf3856ad364e35"/>
</controls>
</pages>
<compilation debug="true">
<assemblies>
<add assembly="System.Web.DataVisualization, Version=3.5.0.0, Culture=neutral, PublicKeyToken=31BF3856AD364E35"/>
</assemblies>
</compilation>
</configuration>
參考來源:http://www.dotblogs.com.tw/shunnien/archive/2013/04/15/101651.aspx
前台
<asp:Chart ID="Chart1" runat="server" ImageStorageMode="UseImageLocation" Visible="false" Width="720px" ImageLocation="~/images/chartTemporary/ChartPic_#SEQ(300,3)">
<Series>
<asp:Series Name="Series1">
</asp:Series>
</Series>
<ChartAreas>
<asp:ChartArea Name="ChartArea1">
</asp:ChartArea>
</ChartAreas>
</asp:Chart>
ImageLocation :暫存圖檔位置及檔案名稱設定。
ChartPic_#SEQ(300,3)的規則為300張圖片為一個循環。
參考來源:
http://www.4guysfromrolla.com/articles/081909-1.aspx
http://www.dotblogs.com.tw/shadow/archive/2011/03/10/21762.aspx
後台
Private Sub CreateChart(ByVal dt As DataTable)
'資料來源為DataTable(欄位名稱MyDateTime及Count)
' xValues:MyDateTime , yValues:Count
For Each row As DataRow In dt.Rows
Dim intPointidx As Integer
'新增該筆資料的XY值,並取得該值的idx
intPointidx = Chart1.Series("Series1").Points.AddXY(row("DateTime").ToString(), row("Count"))
'利用idx顯示該值的ToolTip
Chart1.Series("Series1").Points(intPointidx).ToolTip = row("MyDateTime") & "\n" & row("Count")
'設定Marker
Chart1.Series("Series1").Points(intPointidx).MarkerColor = Color.FromArgb(62, 151, 201)
Chart1.Series("Series1").Points(intPointidx).MarkerStyle = MarkerStyle.Circle
Chart1.Series("Series1").Points(intPointidx).MarkerSize = 10
Next
'增加圖示
Chart1.Legends.Add("Legends1")
Chart1.Legends("Legends1").BackHatchStyle = DataVisualization.Charting.ChartHatchStyle.DarkDownwardDiagonal
Chart1.Legends("Legends1").BorderWidth = 1
Chart1.Legends("Legends1").BorderColor = Color.FromArgb(200, 200, 200)
Chart1.Legends("Legends1").Docking = Docking.Top
'設定X軸及Y軸
Chart1.ChartAreas("ChartArea1").AxisY.ScaleBreakStyle.CollapsibleSpaceThreshold = 20
Chart1.ChartAreas("ChartArea1").AxisY.ScaleBreakStyle.LineColor = Color.Red
Chart1.ChartAreas("ChartArea1").AxisY.LabelStyle.Font = New System.Drawing.Font("Arial", 9, System.Drawing.FontStyle.Regular)
Chart1.ChartAreas("ChartArea1").BackGradientStyle = DataVisualization.Charting.GradientStyle.VerticalCenter
Chart1.ChartAreas("ChartArea1").Area3DStyle.Enable3D = False
Chart1.ChartAreas("ChartArea1").AxisX.LabelStyle.Font = New System.Drawing.Font("Arial", 9, System.Drawing.FontStyle.Regular)
Chart1.ChartAreas("ChartArea1").AxisX.Enabled = DataVisualization.Charting.AxisEnabled.True
Chart1.ChartAreas("ChartArea1").AxisY.Minimum = 0
Chart1.ChartAreas("ChartArea1").AxisX.MajorGrid.Enabled = False
Chart1.ChartAreas("ChartArea1").AxisY.MajorGrid.Enabled = True
Chart1.ChartAreas("ChartArea1").AxisY.MajorGrid.LineColor = Color.FromArgb(150, 150, 150)
Chart1.ChartAreas("ChartArea1").AxisX.MajorGrid.LineColor = Color.FromArgb(150, 150, 150)
Chart1.ChartAreas("ChartArea1").AxisX.IntervalAutoMode = DataVisualization.Charting.IntervalAutoMode.VariableCount
Chart1.ChartAreas("ChartArea1").AxisX.IsLabelAutoFit = True
Chart1.ChartAreas("ChartArea1").AxisX.LabelStyle.IsStaggered = True
'把圖表的左右兩邊空白去除
Chart1.ChartAreas("ChartArea1").AxisX.IsMarginVisible = False
'設定X軸間距
Chart1.ChartAreas("ChartArea1").AxisX.Interval = 1
'設定Y軸間距
Chart1.ChartAreas("ChartArea1").AxisY.Interval = 1
Chart1.Series("Series1").IsValueShownAsLabel = False
Chart1.Series("Series1").LegendText = "DateTime"
Chart1.Series("Series1").Font = New System.Drawing.Font("Arial", 9, System.Drawing.FontStyle.Regular)
Chart1.Series("Series1").ChartType = SeriesChartType.Line
Chart1.Series("Series1").BorderWidth = 3
Chart1.Series("Series1").BorderColor = Color.FromArgb(62, 151, 201)
End Sub
參考資料:
1.http://www.dotblogs.com.tw/suehilary/archive/2011/10/22/45430.aspx
2.http://www.dotblogs.com.tw/shunnien/archive/2013/04/22/102049.aspx
3.http://www.dotblogs.com.tw/mrkt/archive/2008/11/28/6116.aspx
4.http://blog.xuite.net/fenctang/twblog/137597590-asp.net+c%23+MSChart+
http://nickmason.lionfree.net/blog/117/%E5%A5%BD%E7%94%A8%E7%9A%84%E5%9C%96%E8%A1%A8%E5%B7%A5%E5%85%B7-microsoft-chart-control/
5.http://fecbob.pixnet.net/blog/post/38851855-asp.net%E8%B3%87%E6%96%99%E6%8E%A7%E5%88%B6%E9%A0%85%E4%B9%8Bchart%E7%9A%84%E7%94%A8%E6%B3%95
6.http://xpower2888.pixnet.net/blog/post/149675162-ms-chart-%E6%95%B0%E6%8D%AE%E7%BB%91%E5%AE%9A%E6%96%B9%E6%B3%95
7.http://www.dotblogs.com.tw/nobel12/archive/2009/10/22/11206.aspx
8.http://www.blueshop.com.tw/board/FUM20041006161839LRJ/BRD20110304093353IHH.html
重點:一定要寫在Page_Init
protected void Page_Init(object sender, EventArgs e)
{
//動態新增
DataTable dt = new DataTable();
dt.Load(GetZipCity());
if (dt.Rows.Count > 0)
{
LinkButton[] btnZipCity = new LinkButton[dt.Rows.Count];
for (int i = 0; i < btnZipCity.Length; i++)
{
btnZipCity[i] = new LinkButton();
btnZipCity[i].ID = "btnZipCity" + i.ToString();
btnZipCity[i].Text = dt.Rows[i]["CityName"].ToString();
btnZipCity[i].CommandName = dt.Rows[i]["CityID"].ToString();
btnZipCity[i].Click += new System.EventHandler(btnZipCity_Click);
btnZipCity[i].Command += new CommandEventHandler(btnZipCity_Click);
this.PlaceHolder.Controls.Add(btnZipCity[i]);
Label olab = new Label();
olab.Text = " | ";
PlaceHolder.Controls.Add(olab);
}
}
}
// ZipCity Button 的 Click 事件導向函數
protected void btnZipCity_Click(object sender, EventArgs e)
{
LinkButton ZipCity = (LinkButton)sender;
QueryZipCity = ZipCity.CommandName;
}
參考資料:http://careychen.pixnet.net/blog/post/22622126-%5Basp.net%5D-%E5%9C%A8-web-form-%E5%8B%95%E6%85%8B%E5%BB%BA%E7%AB%8B%E6%8E%A7%E5%88%B6%E9%A0%85%E7%9A%84%E6%AD%A3%E7%A2%BA%E6%96%B9%E6%B3%95

